Child's Play
Family Photographic Services
The Colour Purple
Are all colours equal?
- Purple is distinctly different from other colours
- Studying purple shows differences between cameras
- A well-disciplined workflow removes uncertainty in all colours
Introduction
Did you know purple isn't a real colour?
Perhaps I need to back up a bit and define some terms. Isaac Newton first noticed that white isn't a real colour but rather a balance of all the visible colours. Rainbows are a physical manifestation of this that we've all seen. At least I think we've all seen them — well, anyway I've seen them.
The human eye responds to wavelengths of light that go from "comparatively short" (about 480 nm, which is to say there are about 2 million light waves in a metre) to "comparatively long" (about 780 nm, which is to say there are only 1½ million light waves in a metre). The shorter waves get called colours like violet, indigo, and blue. The longer waves get called colours like red, orange and yellow.
The thing is that when you study the science[1], violet isn't really there; to make the colour we think of as purple, you need a mixture of red and blue light. Purple is the only colour that can't be made of a single wavelength of light but instead requires two. Hence my initial assertion that purple isn't a real colour - a little glib, but it serves as a launch pad to introduce these ideas.
Well, so what, you might say — and indeed most of the time, so what. But when dealing with cameras and purple things, it really starts to matter.
Camera Profiling
We spend a lot of time and effort getting "accurate" colours these days. The basic essence of the whole process is that we compare what our equipment gives to some known reference, and calculate an adjustment to be applied to make our equipment reproduce that known reference. This is a bit tricky but not inordinately so when we are dealing with one colour at a time.
However, with purple we are simultaneously trying to deal with light at both ends of the spectrum, and this can get somewhat more difficult.
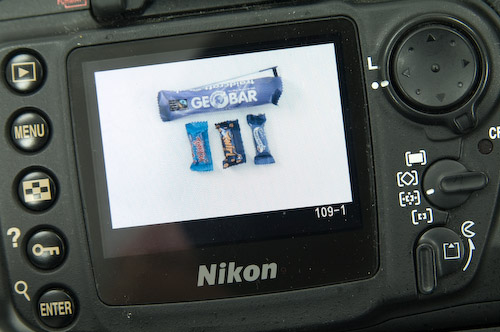
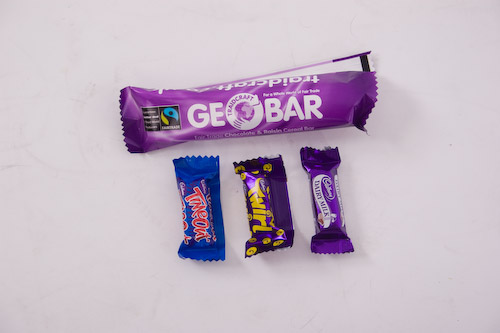
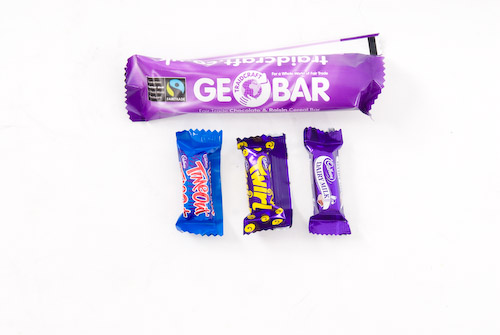
In a recent experiment, I photographed some purple, blue and red things — chocolate wrappers, actually, since I keep a ready supply in my studio for when small people visit. They were photographed on a Nikon D200 and a Canon 30D, the latter belonging to Ben, a work experience student with me. They were under the same studio lights and both were photographed in RAW format.
Immediately apparent was that the display on the back of the Nikon is alarmingly unable to represent purple in any way, shape or form. It just comes up blue. I think the complete lack of anything even vaguely resembling purple is clear. I've noticed this before, in fact it was that observation that triggered my headlong rush into understanding colour management.
Pulling both raw files into Adobe Lightroom on my MacBook Pro showed immediate differences in the way the colours were rendered. It also moved the Nikon away from its resolute blueness and towards something resembling purple. However, neither image really quite looked like the actual wrappers in the studio. [The studio is lit with 6500 Kelvin fluorescent tubes and the screens are calibrated to 6500 Kelvin too, so it is a fair comparison to make]. The Canon prominently displayed an orangey tinge to the red on the Time Out wrapper, and although the purples were more convincing emotionally, they did actually look quite a lot too red compared to the real wrappers.
 Nikon D200 Sweet Wrappers - Imported with Lightroom Defaults
 Canon 30D Sweet Wrappers - Imported with Lightroom Defaults
In the same studio under the same lights, both cameras were pointed at my Gretag MacBeth ColorChecker™. I'm sorry, I can't resist writing that out in full. Something about trademarking "ColorChecker" makes me bridle. In what the Americans call British English (we English just call it "English", but there you go), something in a pattern with squares is a "chequerboard" and the game is "chequers". I think "ColourChequer" is what it should be called. Then it would be a marvellous pun — but they are Swiss, so how much humour can one expect? Anyway, I digress.
The resulting RAW images (of the checker board) were imported into Photoshop CS3 and the Simon Tindeman's ACR Calibrator script was run on them.
- Download the script by clicking on the link in the page given above, command-clicking (right-clicking on Windows) and then "Save as…" into the Photoshop Scripts directory before using it as directed.
-
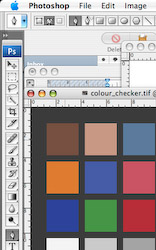 The only wrinkle to using it from Simon's description is understanding
what a "path" is — it wasn't that clear to me. Go to the pen tools
icon, then in the toolbar at the top select "Paths" and "Pen Tool".
Click and release in the middle of the top left patch ("dark skin"), then
the bottom left patch ("white"), the bottom right patch ("black"), the
top right patch ("greenish blue") and then back to your first click point
so that a little circle appears next to the cursor and you close the
rectangular path. If the little circle doesn't appear, you will make a 5
point path and the ceiling will fall on your head[2]. All references to top,
bottom, left and right are made when you can read the "Gretag Mac…" label
on the bottom in the normal western orientation.
The only wrinkle to using it from Simon's description is understanding
what a "path" is — it wasn't that clear to me. Go to the pen tools
icon, then in the toolbar at the top select "Paths" and "Pen Tool".
Click and release in the middle of the top left patch ("dark skin"), then
the bottom left patch ("white"), the bottom right patch ("black"), the
top right patch ("greenish blue") and then back to your first click point
so that a little circle appears next to the cursor and you close the
rectangular path. If the little circle doesn't appear, you will make a 5
point path and the ceiling will fall on your head[2]. All references to top,
bottom, left and right are made when you can read the "Gretag Mac…" label
on the bottom in the normal western orientation. - Running the script produces a progress window in CS3, the checker board image disappears and keeps re-opening without displaying, which can be a little alarming at first but it is all normal. If you are numerically minded, like me, it's quite interesting to watch the iteration converge. If you aren't, it might be best to get a cup of tea. It takes my Intel MacBook about 20 minutes to converge in CS3. Interestingly with CS2 running under Rosetta it took about 55 minutes to converge. Crikey.
-
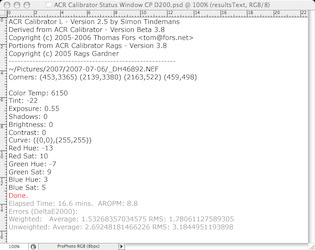 Once the script is done, it reports several values to you. These values need
to be transcribed into the ACR dialogue box or into the develop settings for
the image in Lightroom. Once the develop settings are made, they can be saved
as a Preset in the left hand panel and applied automatically on import if
required. "Color Temp" and "Tint" go in the "Basic" panel in the "WB" subsection.
"Exposure" tells you how well you exposed your Colour Chequer but doesn't
apply to every image you'll ever bring in, best leave it at zero.
The other values, Red, Green and Blue Hue and Saturation (6 in total) all go
in the Camera Calibration panel. A word of caution; don't ever
be tempted to put the "Tint" value into the "Shadows Tint" section.
Once the script is done, it reports several values to you. These values need
to be transcribed into the ACR dialogue box or into the develop settings for
the image in Lightroom. Once the develop settings are made, they can be saved
as a Preset in the left hand panel and applied automatically on import if
required. "Color Temp" and "Tint" go in the "Basic" panel in the "WB" subsection.
"Exposure" tells you how well you exposed your Colour Chequer but doesn't
apply to every image you'll ever bring in, best leave it at zero.
The other values, Red, Green and Blue Hue and Saturation (6 in total) all go
in the Camera Calibration panel. A word of caution; don't ever
be tempted to put the "Tint" value into the "Shadows Tint" section. - Simon recommends running this on the camera at different illumination levels, so I photographed the colour chequer in my kitchen using available light, outside at noon and in the studio under flash to give three different calibrations.
Once the two calibrations had been applied to the images, they looked remarkably similar. I think the Nikon optics have a little more contrast in them, but there's not much to call it really. Since we didn't use a tripod the framing, and hence some of the reflections in the wrappers, aren't identical, which with hindsight was an error. Both images showed a great subjective colour match to the items in the studio and either would be acceptable to a commercial client.
 Nikon D200 Sweet Wrappers - Corrected via ACR
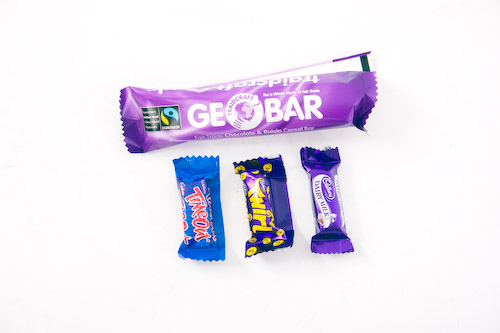 Canon 30D Sweet Wrappers - Corrected via ACR
Conclusions
- Although the camera doesn't lie, it sometimes needs a little inducement to really tell the truth — especially where purple is concerned.
- If accuracy is paramount, a well-disciplined colour-managed workflow can be helpful in eliminating variation.
- A calibration for a camera to reproduce a known colour sample — for example a Gretag MacBeth ColorChecker™ — is a great starting point in any application that uses Adobe ACR.
- Even when the wrappers were completely the wrong colour on screen, the chocolate tasted fine.
Click here to see the accompanying article on digital resolution and image storage and here to read another article about why we use Fuji Velvia and how it compares to digital.
Damian Harty, Photographer, Child's Play
In another life, Damian was a trained engineer with Bachelor and Master's degrees and a Fellow of the Institution of Mechanical Engineers. This goes some way to explain his inability to simply use technology but his preference rather to deconstruct it and write down what he finds. And then use it.
[1] http://www.fho-emden.de/~hoffmann/ciexyz29082000.pdf
[2] This is a lie. Under no circumstances will the structural properties of any ceilings be influenced by running scripts in Photoshop.
© 2007 Damian Harty. Design by Andreas Viklund.